Saturday, January 22, 2011

Glass Magnets

This is my first time posting on poshISH, thank you Eliza for the invite. Here is a really simple craft my sisters and I did together. We used decorative glass stones to make really cute magnets.

Here is what you need:
Tacky glue, round glass decorative stones usually used in vases (you can find these at any craft store or in the home decor section of most stores), magnets and scraps of paper (I tried to choose paper that matched the color scheme of my kitchen).
First you cut out circles about the same size as the stones, I recommend tracing something like a quarter.

Second, you apply tacky glue to the flat side of the glass stone.  Next glue one of the circles of paper face down to the stone.  Press down on the paper firmly (it is good thumb workout) and wipe off the excess glue.


Third, you don't have to do this, but it worked out well.  Once the glue is dried (we waited maybe 45 minutes) we brushed a little Mod Podge over the paper and flat side of the stone so the paper wouldn't peel off.

Last, once the Mod Podge is dried, if the magnets have a sticky side (which is the kind I recommend getting) stick the magnet on the flat side of the glass stone on top of the paper in the center.  If the magnets don't have a sticky side, use the tacky glue or a hot glue gun and wipe of the excess.  Once again, press firmly.

Applying the magnet.
And now for the final product (drum roll please...)

Ta da!!
I thought they turned out really cute and now I have magnets that match my kitchen.  My very creative sister-in-law Katie did this but instead of using decorative paper, she used pictures of her kids and gave the magnets as a gift to my mom.  They turned out to be an adorable and thoughtful gift.

Wednesday, January 19, 2011

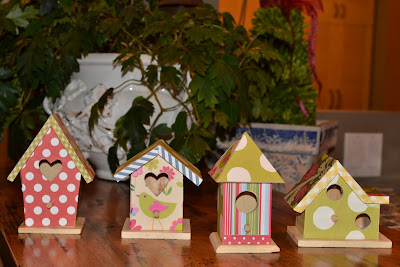
bird houses

While I was at Joanns today I found these darling little wood bird houses. While I was walking up and down the isles I was trying to think of something fun to do to them for my little girls new room. I came across some darling decorative papers, mod podge and away I went.  

Super Easy, Super Inexpensive & Super Fun! 

To make these bird houses you will NEED:
Mod Podge
scissors 
Pencil
Decorative paper
Wood Bird houses {found at Joanns for $1)

#1Trace the paper onto the bird house.
#2 Mod podge each side of the bird house and paste your paper.
#3 Wait 20 minutes
#4 Mod podge the the entire bird house once the papers have been glued down to give it a finished look.


Here is what I am trying to accomplish for my daughters new room. I would LOVE to cover one of her walls:


Mod Podge Blocks


Hi there! I am excited to be a part of this blog! I LOVE DIY projects and find myself doing them more and more each day. Here is a super easy and cheap and cute project anyone can do.

I made these for my friend Rebecca to go in her baby boy's nursery. I also made some that say "family" for my mom for Christmas. They are a great gift and add cute decor to any room!


Here's the low down:

Materials:
Wooden blocks - head to Home Depot and buy a "Cull" of wood. Don't leave before having them cut it for you! A cull is about 50 cents. Yes super cheap! I had the nice worker guy cut my cull into blocks that are 3", 4" and 5" to have a variety. I was able to get about 15 blocks from one cull.
Sand Paper - This isn't a must but it I sanded my blocks around the edges so they wouldn't be so sharp.
Cute scrap book paper
Mod podge
paint or spray paint - I used spray paint because it is super fast and cheap (1$)

How to make them:
After sanding your blocks, paint them or spray paint them. After letting them dry cut your scrap book paper to fit and use mod podge underneath and over the paper to seal it to the block. Next you can use a handy dandy Cricket to cut your letters OR you can make them on the computer, print and cut them out and then use it as a stencil OR you can simply draw and cut out your letters. Whichever way works best for you! Then you place the letter on the scrap book paper that has mod podge on top (before it dries) and use mod podge again on top of the letter. Let it dry for about 24 hours before transporting. You can also add felt to the bottom to protect the surface you'll be displaying them on.

And that's it! It's a fast and easy and definitely cheap project. I'm already making more!

Tuesday, January 18, 2011

Seasonal pillowcases

I can't take credit for these, my mom made them for the kids for Christmas. But I thought it was such a cute idea! A different pillowcase for each major holiday, then a sports one for everything in between. She even sewed the name of the child on each pillowcase, and they all have their own set. These could make fun gifts for birthdays or Christmas.